The Complete Kitchen Organization Guide for South African Homes
The kitchen is the most used room in almost every South African home — the place where meals are prepared, conversations happen, homework is done at the counter, and the day begins and ends. Yet for most households, it is also the room that causes the most daily stress: searching for the right pan, discovering you have three jars of the same spice but none of the one you need, clearing counter clutter before you can even begin cooking, or navigating an overcrowded fridge that somehow never contains what you actually need for dinner.
Kitchen disorganization is not a character flaw. It is a systems problem — and like all systems problems, it has a clear, practical solution. A well-organized kitchen is not just aesthetically pleasing; it is a genuine daily time-saver, a food-waste reducer, and a stress reducer that pays dividends every single time you cook. Whether you have a compact apartment kitchen or a sprawling family home layout, the principles in this guide will help you build an organized kitchen that actually works for your life — with specific product recommendations available across South Africa.
Step 1: The Non-Negotiable First Step — Declutter Everything
No organizational system will work in a kitchen that contains more than it needs to. The first step — and the most important — is a ruthless, honest declutter before you buy a single basket, jar, or drawer insert. Organization products cannot organize excess; they can only contain it more neatly while making the underlying problem harder to see.
How to declutter your kitchen properly:
- Empty every cupboard, drawer, and shelf completely. Yes, every single one — this is non-negotiable for the process to work. Place everything on the kitchen table or floor so you can see the full inventory.
- Sort into three categories: Keep (used at least once a month), Maybe (used occasionally but genuinely valuable), and Donate/Discard (not used in the past year, duplicates, broken, or no longer serving you).
- Be honest about appliances. The bread maker that has not been used since 2022, the juicer that lives in the back of the cupboard, the specialty cake tin for the one recipe you have not made since your children were small — these items are consuming premium storage space in one of the most used rooms in your home. Donate them to a charity shop or sell on Facebook Marketplace.
- The "15th coffee mug" rule: count your mugs, glasses, plates, and bowls. Unless you regularly host large gatherings, most households need far fewer than they own. Keep enough for your household plus six guests; donate the rest.
- Check expiry dates on everything in your pantry and spice drawer. South African pantries consistently contain expired items — spices that have been there since the previous decade, condiments that were bought for one recipe and never used again, tins of things no one in the household will actually eat. Discard them without guilt.
Only after the declutter is complete should you begin thinking about storage solutions. You will almost certainly need significantly fewer organizers than you expected — because the primary problem was too much stuff, not too little storage.
Step 2: Design Your Kitchen by Activity Zones
The most productive kitchens in the world — from professional restaurant kitchens to the homes of experienced cooks — are organized around activity zones: logical groupings of tools, ingredients, and equipment based on how they are used together. This principle, applied to your home kitchen, eliminates the frustrating cross-kitchen trips that fragment every cooking session and make simple tasks feel complicated.
Map your kitchen into these five zones and store accordingly:
- The Prep Zone: Your primary workspace — typically the largest clear countertop section. Store knives (on a magnetic strip on the wall or in a knife block on the counter — never loose in a drawer where they blunt and become dangerous), cutting boards (upright in a divider or mounted on the wall), mixing bowls, measuring cups, a grater, vegetable peeler, and colander within immediate reach. This is where 80% of your cooking preparation happens; everything needed for that preparation should be reachable without moving your feet.
- The Cooking Zone: The area immediately around your stove and oven. Store pots and pans in the cabinet directly under or adjacent to the stove. Keep oils, salts, and your most-used spices within arm's reach — a small, curated selection on the counter beside the stove or on a shelf above it. Everything you reach for while something is on the heat should be accessible in seconds.
- The Pantry Zone: Your dry goods storage — pasta, rice, flour, sugar, tinned goods, cereals. Organize by category (baking ingredients together, grains together, tinned goods together, snacks together), with the most frequently used items at eye level and the less frequent ones above or below. First In, First Out (FIFO) principle: when restocking, bring older items forward and place new purchases behind them.
- The Cleaning Zone: Under the sink and its immediate surrounds. Keep dish soap, sponges, cleaning cloths, and surface cleaners here. Use an under-sink organizer to make the most of this awkward space — a two-tier pull-out rack or a tension rod for hanging spray bottles significantly improves access.
- The Coffee and Breakfast Station: If you drink coffee or tea every morning, a dedicated station makes the morning routine dramatically smoother. Group your coffee machine, kettle, mugs, spoons, sugar, coffee, and tea together in one location. This is one of the highest-return organizational investments for most SA households — morning routines are time-pressured and any friction reduction is amplified by frequency.
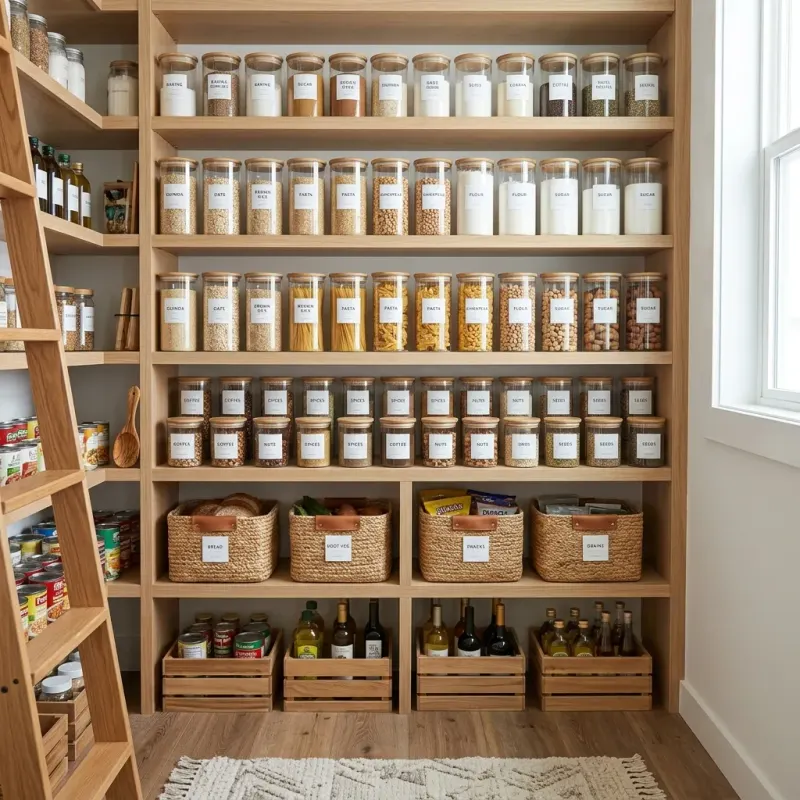
Step 3: Decant Your Pantry for Visibility and Freshness
Decanting dry goods — transferring them from their original packaging into clear, airtight containers — is one of the most photographed aspects of kitchen organization, and it has become associated with aspirational lifestyle aesthetics. But the practical case for decanting is as strong as the aesthetic one, and it deserves to be understood on its merits.
Why decanting works:
- Prevents pests: In South African kitchens, weevils, moths, and ants are a persistent issue, particularly in humid coastal homes or during summer. Transferred to sealed airtight containers, dry goods are completely protected from infestation. Original paper or thin plastic packaging is easily penetrated.
- Extends freshness: Airtight containers dramatically slow the staleness of flour, rice, pasta, cereals, and spices compared to their original packaging, which is rarely resealable effectively.
- Instant inventory visibility: At a glance, you can see exactly what you have and how much. This eliminates the overbuying of items you already have and the discovery — mid-recipe — that you have run out of something you thought you had.
- Consistent volume: Once your containers are filled and labelled, restocking is a clear, simple task with no ambiguity.
What to decant: Start with the highest-use items — flour, sugar, rice, pasta, oats, coffee, and your most-used spices. You do not need to decant everything immediately. Build your collection gradually.
SA sourcing options: Wham! containers from Pick n Pay and Checkers offer excellent value. OXO Good Grips pop-top containers are widely available at Woolworths Food and @home at a premium price point. For a budget-friendly approach, clean glass jars from pasta sauce or jam (Oros, Marina, etc.) work perfectly well for pantry storage — simply add a chalk label with a paint marker.
Labelling: Every decanted container should be labelled — not because you will forget what flour looks like, but because the discipline of labelling keeps the system maintained and makes it usable by everyone in the household, not just the person who set it up. Chalk labels, blackboard paint labels, or simple masking tape with a permanent marker all work well.
Step 4: Maximize Cabinet and Drawer Space with Smart Inserts
Most South African kitchen cabinets are inefficiently used — large open spaces that force you to stack things precariously, store small items at the back of deep shelves where they are forgotten, or underutilize the full height of the cabinet. A small investment in organizational inserts transforms these spaces dramatically.
Cabinet solutions:
- Shelf risers / plate racks: Double the usable vertical space inside a cabinet by adding a shelf riser. Store plates or bowls on two levels instead of one stack that becomes precarious and difficult to access.
- Lazy Susans (turntables): Indispensable for corner cabinets and deep shelves where items get lost at the back. A turntable in your spice cupboard, your cleaning supplies cabinet, or your condiment shelf means everything is always accessible with a single spin. Available at most SA kitchenware stores for R50–R200.
- Pan organizers: Vertical pan organizers (like a rack of parallel steel dividers) allow you to store lids, baking trays, and pans vertically rather than in precarious horizontal stacks that avalanche every time you remove the bottom item. A game-changer for anyone who cooks regularly.
- Door-mounted storage: The inside of cabinet doors is frequently wasted space. Adhesive or screw-mounted organizers can hold cling wrap and foil boxes, spices, cleaning products, or pot lids on the inside of cabinet doors — adding storage without consuming shelf space.
Drawer solutions:
- Bamboo or plastic drawer dividers: The utensil drawer — the most chaotic drawer in virtually every South African kitchen — is transformed by a simple set of dividers that give every category of utensil its own compartment. When everything has a specific home, it is returned to that home consistently, and the drawer stays organized.
- Knife block or magnetic strip: Knives stored in a general utensil drawer blunt rapidly against other metal objects and are a safety hazard. A countertop knife block or wall-mounted magnetic knife strip keeps blades protected, sharp, and safely accessible.
- Cutlery tray: A divided cutlery tray in the appropriate drawer size is the most basic drawer organization tool — and the most consistently impactful. Available everywhere from R30 at Shoprite to R300+ at @home in various materials.
Step 5: Tackle the Fridge and Freezer
The refrigerator is where food waste happens — and South African households waste an estimated 10 million tonnes of food per year, much of it lost to forgotten items in poorly organized fridges. A well-organized fridge reduces food waste, reduces the cost of your grocery bill, and eliminates the daily frustration of not being able to find what you need.
Fridge organization principles:
- Temperature zones: The coldest part of your fridge is the bottom shelf — store raw meat, fish, and poultry here (always in sealed containers to prevent cross-contamination). The door is the warmest part — store condiments, juice, and non-temperature-sensitive items here, not dairy or eggs.
- Visibility first: Store leftovers and items that need to be used soon at eye level at the front of shelves. Items that can wait go at the back. A weekly "fridge audit" — a five-minute check on Sundays before shopping — identifies what needs to be used in the coming week and informs your meal planning.
- Clear containers for leftovers: Leftovers in opaque containers are leftovers that get forgotten. Transparent containers in standardized sizes (square Tupperware or glass containers stack far more efficiently than mixed shapes) make it immediately obvious what is available and how much is left.
- Produce drawers: Most SA fridge produce drawers are either overstuffed (which reduces airflow and accelerates spoilage) or used for non-produce items. Line them with a layer of absorbent paper to soak up excess moisture, and store produce by type: leafy greens in one drawer, firm vegetables and fruits in the other.
Step 6: Maintain the System — The One-In, One-Out Rule
An organized kitchen that gradually returns to chaos within three months is a common outcome when the system is set up but not maintained. The most effective maintenance principle is simple: for every new item that enters the kitchen, an old item must leave.
Bought a new air fryer? The old one that has been sitting unused for two years donates. A new set of matching containers? The old mismatched ones go. This keeps the total volume of kitchen contents stable and prevents the slow accumulation of "just in case" items that eventually overwhelm any organizational system.
Set a five-minute weekly maintenance habit: Sunday evening, quickly check that everything is in its zone, return any stray items to their correct place, and wipe down countertops. Five minutes of maintenance weekly is far less effort than a full re-organization annually.
A well-organized kitchen makes every other aspect of home life run more smoothly — from the 15-minute weeknight dinners that busy schedules demand to weekend entertaining. Combine kitchen organization with a thoughtfully decorated home and you create living spaces that feel genuinely supportive of the life you want to live. Join the Inspiring Women community for more practical home and lifestyle strategies from South African women who have been exactly where you are.